VMware Workstation (and presumably the other enterprise-grade products in the VMware family) come with the handy “shared folders” feature which makes sharing files between a host and a virtual appliance nice and simple. The free products (VMware Player and Server) do not, unfortunately, have this ability and so we must find another way.
This quick guide shows how to use Samba to achieve the same aim. It is aimed at Ubuntu users but (the general concepts at least) should work on any modern Linux distribution. It is also written with a Windows XP guest in mind but a similar process should work in Windows Vista, Windows 2000 and other operating systems.
The goal is to set up a network share which both operating systems can transparently read and write to.
For reference, I am using Ubuntu 7.04 (Feisty).
Which VMware?
I’ll presume you have VMWare already installed with a Windows XP guest virtual appliance already set up. This guide is aimed at users of VMware Player and Server editions (I am using VMware Player).
VMware Player is a simple:
sudo apt-get install vmware-player |
away. For the Server edition, you’ll probably want to consult the wiki.
Install Samba
If you don’t already have Samba installed, now would be a good time to do it:
sudo apt-get install samba |
In order to keeps things clean and easy to manage, we’ll set up a new user account to own the share. This account name will be used when connecting to the share from within Windows. For the purposes of illustration, I will be creating a share called sandbox with the username and group also being sandbox.
Create the new group and user account with no login privileges:
sudo groupadd sandbox sudo useradd --gid sandbox --shell /bin/false sandbox |
To avoid creating a redundant home directory, you can add:
--home /nonexistent |
to the end of the previous command.
Now you need to add a matching Samba account. You’ll be prompted to set a password – make note of this as this is what you will use to connect to the share from within Windows.
sudo smbpasswd -a sandbox |
Next you’ll need to create a directory to be used as the share (assuming you don’t already have one). Create a directory, setting the username to your usual login and group to sandbox. Then chmod the directory 775 (assuming you wish both yourself and the virtual appliance to have read/write access). Here is what I entered:
cd $HOME mkdir sandbox sudo chown russ:sandbox sandbox sudo chmod 775 sandbox |
When you write to the share from within Ubuntu, new files will be created with the default permissions 644 with the username and group being your own user account. When your Windows client connects to the share, it will access it as if it were the local system user sandbox and so the group permissions will apply and you won’t be able to write to any files created from within Ubuntu.
To get around this problem, we can set the groupid bit for the sandbox directory which means all new files created will inherit the permissions of the parent and so the sandbox user from within Windows will be able to make read and write changes as desired, you can download them as pdf with sodapdf.
sudo chmod g+s sandbox |
If you don’t understand the above, don’t worry, just chmod the directory with the command above and all should be well.
Setting up the Samba share
Now all that’s left to do is to tell Samba about our share. Open up /etc/samba/smb.conf in your favourite text editor.
sudo gedit /etc/samba/smb.conf |
Firstly, we need to set the security mechanism to user. Look for the line:
security = user |
and make sure it is uncommented (remove the preceding semicolon if there is one).
Now, scroll down to the Share Definitions section and add the following:
[sandbox] path = /home/russ/sandbox valid users = sandbox read only = No create mask = 0777 directory mask = 0777 |
Be sure to set the correct path to your share. Save the file and restart the Samba daemon:
sudo /etc/init.d/samba restart |
That should be it. You should now be able to connect to your share from within the Windows guest. At this point you need to know what IP address to connect to from within Windows. This depends on what networking mode you are using for your virtual appliance.
Bridged Networking
In this mode, your guest OS has its own IP address and so the address it needs to connect to is your usual host machine’s address. In this case your address is probably the top line from the output of this command:
ifconfig | grep "inet addr:" |
NAT networking
In this mode, your guest OS shares your host’s address (in terms of other machines on the LAN) and communicates with the host via a private network. In this case, the IP address you need to connect to is most likely the bottom one from the output of this command:
ifconfig | grep "inet addr:" |
Connecting to the share from within Windows
If you are unsure as to your host’s IP address, try and ping it first from within the Windows guest to confirm you have the right one.
Having worked out what IP address to connect to, you should now be able to connect to your share from within Windows.
The easiest way to do this is:
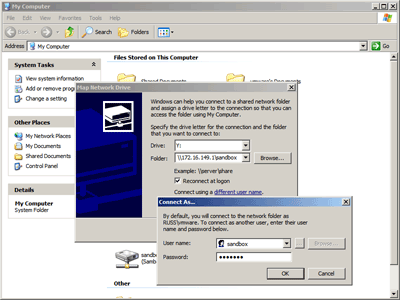
- Open up My Computer
- Go to the Tools menu and then Map Network Drive
- Choose a drive letter to map the network share to
- In Folder, enter: \\HOSTIP\sandbox (replacing HOSTIP)
- Click “Connect using a different user name” and enter:
- username: sandbox
- password: yourpassword
- Click OK and then the Finish button to connect
Hopefully, congratulations are in order. If not, be sure to make sure that any firewalls you have running (host or guest) have the correct rules set to allow communication between the two systems.
A note on security
At this point, assuming you have a successful connection, it is worth noting that any other machine on your local network (and potentially the internet if you are not behind a NAT or firewall) can connect to your share (assuming they have the correct credentials).
If you are only using Samba for sharing with VMware (as I am), you may wish to restrict access to VMware only. This is quite easy to do since VMware creates virtual network interfaces for communication between hosts and guests. This means we can set Samba up to ignore any communications that do not originate from these interfaces.
To do this, open up your Samba configuration file again:
sudo gedit /etc/samba/smb.conf |
Make sure you have a:
bind interfaces only = true |
line and that it is uncommented (remove any preceding semicolons). Just above this should be an interfaces line (most likely commented out). Add the following just below this:
interfaces = vmnet0 vmnet1 vmnet8 |
These are the virtual interfaces VMware uses for each type of virtual networking: bridged, host only and NAT respectively.
After making the changes, you will need to restart Samba again:
sudo /etc/init.d/samba restart |
and possibly shutdown your VMware session and restart the VMware service:
VMware Player:
sudo /etc/init.d/vmware-player restart |
VMware Server:
sudo /etc/init.d/vmware restart |
Finished
You should now have a Samba share configured which is only accessible from your VMware guest appliances. Good luck!
April 29, 2007 — 7:15 am
thanks it worked
April 30, 2007 — 12:22 am
Thanks for the guide. Got everything up and running smoothly!
May 5, 2007 — 8:13 am
Connecting to SAMBA from the windows guest just doesnt seem to work in bridged – any ideas. Worked first time in NAT.
May 9, 2007 — 7:08 am
Thank you! Just worked!
May 9, 2007 — 9:11 pm
Thanks a lot for this tutorial. I’ve been trying to get samba+vmware to work for days. Now it’s up and running.
May 10, 2007 — 11:45 pm
i followed all the steps and at last when trying to connect with map network drive from windows, it says that the network location cannot be reached… and i am pretty sure that i have done everything correctly
May 10, 2007 — 11:50 pm
i changed vmware to use NAT connection and it worked like a charm thanks… still, not understanding why the bridged connection didn’t work.
May 11, 2007 — 8:53 pm
Thanks for posting this, it worked perfectly on my ubuntu feisty x64 install.
May 12, 2007 — 9:18 pm
it workes for me
exept for the line
interfaces = vmnet0 vmnet1 vmnet8
for some reason it get blocked
maybe it would be nice to publish your .vmx fille
May 23, 2007 — 4:41 am
Thanks a lot, it works very well. had the problem where the network bridge did not connect but switching to NAT worked great.
June 5, 2007 — 10:13 am
Thanks. This works. I’ve got a debian linux as VM (running through VMplayer) on my windows XP desktop & I was able to successfully share a folder between the VM and my desktop.
June 5, 2007 — 11:00 pm
Interesting Arun – I didn’t consider the possibility of doing this in reverse!
Glad you were successful.
June 8, 2007 — 12:43 am
If any of you see your files/folders in the winxp share but cannot access the files, don’t forget to check the file/folder permissions of the items you transferred into the “sandbox” folder.
June 9, 2007 — 4:33 am
thank you for the well written and understandable tutorial, it now works
June 17, 2007 — 5:43 pm
Hi !
does not work with bridged network.
Any ideas ?
thanks
karl
June 18, 2007 — 10:02 pm
I have Ubuntu as the host, and Win XP as the guest. I can see an Ubuntu shared folder from Win XP. I can see a Win XP shared folder from another computer. But when I am on my host computer and I try to explored shared folders on the Windows XP virtual machine, Ubuntu shows me the Ubuntu shares instead! Bridged connection.
June 18, 2007 — 10:04 pm
Oh, but if I use the IP address of the virtual machine as the server name, it works.
June 21, 2007 — 4:05 pm
Same as Mike, everything worked but the interfaces option.
If I execute ifconfig while VMware player is running, I do not have any vmnet0 device. I have tried NAT and bridged but there were no changes.
If I do not use ‘interfaces’, everything works, but I would like to block connections from outside.
Any idea? Thanx!
June 22, 2007 — 1:42 pm
Problem solved! I was using a wrong IP address. Works like a charm!!
July 23, 2007 — 10:57 pm
Thanks,
It worked perfectly for me too!
July 27, 2007 — 3:26 pm
Thanks for the tutorial.
In case I use NAT everything works perfectly (including bind interfaces only = true), but no success using BRIDGED so far.
July 29, 2007 — 4:23 pm
Thank you it works fine. I still have a question… Your “trick” suppose that you are connected to the internet. Is it possible to use this trick without being connected to the internet?
Thanks again
July 30, 2007 — 10:56 am
A way (workaround) for using bridged connection and having the samba share to work is to add a second ethernet adapter of host-only type to the virtual machine and use this one to map the network driver.
Running “ipconfig /all” in the guest system will show two IPs. The first one related to your bridged connection and the second one for your host-only connection, in my system the latter is 192.168.150.128. Hence when I map my network drive I use:
\\192.168.150.1\sandbox
August 2, 2007 — 4:35 am
Thank you for your How To. It solved a lot of problems.
a couple of comments to make thing more clear. This command didn’t work:
sudo chown russ:sandbox sandbox
because “russ” is the author’s name (not readers one). So according to the explanation in the HowTo it should be:
sudo chown sandbox:sandbox sandbox
that is also pretty puzzling. Generally it should look like:
sudo chown username:group foldername
It would be better to apply different names to group, user and folder, just for the purpose of the tutorial.
Another issue was with the connection. Maybe I am wrong, but we can’t use the existing NAT, which is used by VMWare internally. The connection happened after I had added the second BRIDGET network card to virtual Windows.
But this How To was the only which worked for me, thank you very much!
August 13, 2007 — 8:00 am
Everything worked for me (on Ubuntu Feisty) but for the binding to the interfaces. I noticed that when I change the following line:
interfaces = vmnet0 vmnet1 vmnet8
to:
interfaces = vmnet0, vmnet1, vmnet8
it ALL worked!
Thank you very much for the tutorial!
September 15, 2007 — 10:30 am
Thanks a lot for this tutorials. Initially only NAT worked for me because I messed my samba config but after following this guide and vmware docs bridge mode works as well.
I’m using Ubuntu 64bit host and vista ultimate 32bit as guest. I can see vista vm from ubuntu and vice versa.
Thanks again.
November 7, 2007 — 9:31 pm
Thank you thank you ! I’m new to linux and the piece I was missing was the permissions. I didn’t have them quite right but you showed what permissions were required which is just what I needed
November 18, 2007 — 12:59 pm
Fantastic, straightforward “how to”, worked perfectly thank you
November 19, 2007 — 1:35 am
Thank you very much for this great comprehensive article. You saved me a lot of time and effort.
thanks,
R
keep spreading the knowledge
November 21, 2007 — 10:03 pm
Thaks. good Job. you saved my day
January 6, 2008 — 4:18 pm
Man…
You really kick ass!!!
This post was wonderful…
I have made through the steps smoothly… An in addiction I’ve learned how to share folders in my windows network!
Thank you very much!
(Votes up for StumbleUpon)
January 20, 2008 — 4:47 pm
Great tutorial !!! Everything works like a charm
January 25, 2008 — 9:53 pm
Hi,
I am having trouble getting Windows (Vista Home Premium) to see my Linux machine. I have followed the instructions above but I cannot determine the correct IP address to connect from within Windows (I tried 192.168.1.3).
I also did an ipconfig /all command from Vista, but it did not return a device with an IP of 192.168.1.3.
Here is the IP info from Linux. Can anyone help?
Thanks!
-Josh
josh@Gateway:~$ sudo gedit /etc/samba/smb.conf
Fontconfig error: “~/.fonts.conf”, line 1: XML declaration not well-formed
josh@Gateway:~$ sudo /etc/init.d/samba restart
* Stopping Samba daemons… [ OK ]
* Starting Samba daemons [ OK ]
josh@Gateway:~$ ipconfig -a
bash: ipconfig: command not found
josh@Gateway:~$ /sbin/ifconfig
eth0 Link encap:Ethernet HWaddr 00:0C:F1:99:0F:16
inet addr:192.168.1.3 Bcast:192.168.1.255 Mask:255.255.255.0
UP BROADCAST RUNNING MULTICAST MTU:1500 Metric:1
RX packets:949866 errors:0 dropped:0 overruns:0 frame:0
TX packets:706138 errors:0 dropped:0 overruns:0 carrier:0
collisions:0 txqueuelen:1000
RX bytes:926253488 (883.3 MB) TX bytes:86261274 (82.2 MB)
lo Link encap:Local Loopback
inet addr:127.0.0.1 Mask:255.0.0.0
UP LOOPBACK RUNNING MTU:16436 Metric:1
RX packets:4696 errors:0 dropped:0 overruns:0 frame:0
TX packets:4696 errors:0 dropped:0 overruns:0 carrier:0
collisions:0 txqueuelen:0
RX bytes:711559 (694.8 KB) TX bytes:711559 (694.8 KB)
josh@Gateway:~$
February 12, 2008 — 9:17 pm
Thank you!!! It worked perfectly 😉
February 24, 2008 — 3:41 am
It really work !!! My machine is Ubuntu Host and windows xp Sp2 Guest Os.
Thanks a lot for this useful guide.
salu2
March 1, 2008 — 4:16 am
Just too good!
March 9, 2008 — 2:17 am
Works, only for NAT, I have not been able to make it work on Bridged, however, this post was simply amazing and wonderful!!! Thanks for sharing your knowledge with us!!!
March 13, 2008 — 11:12 pm
Hi , just wanted to say great tutorial, relatively new to Linux and this worked like a dream. Like some previous posts am having issues when trying to lock down share to vmnet connections only IE The final step in your instructions but can probably live with that till I figure out why.
Cheers
Jeff
March 16, 2008 — 12:03 pm
A really good tutorial.
I was very disappointed that the Workstation solution
was not available and couldnot find the correct route
myself.
Now it works!
Thank you very much!
March 21, 2008 — 11:12 pm
I’ve just tried under ubuntu 7.10 and XP on laptop, excellent how-to, works fine. Thank You.
Greetings from Polland.
April 28, 2008 — 10:53 pm
Hi Russ,
Thank you very much for this clearly written tutorial – works perfectly (Ubuntu on Vista).
Great work,
Rgards,
Mike.
May 15, 2008 — 2:50 pm
Great explanations!!!
many thanks,
gennaro
May 27, 2008 — 2:05 pm
I have been trying to do this for ages. Finally some instructions that lead step by step. Thanks.
kathy
June 8, 2008 — 4:07 pm
Great post.
On my system (RHEL) using NAT in order to find the correct IP address I had to go to my XP Guest and open a CLI (cmd.exe) then do
ipconfig
The gateway address is the one I needed.
HTH
June 18, 2008 — 2:22 pm
it worked ! wow! thanx a lot!
id been struggling with this file sharing issue for like a month … very frustrating
June 26, 2008 — 9:28 am
Hi Russ!
Thanks a lot for the tutorial. It worked for me – NAT, not bridged! (Win XP on Ubuntu Hardy 64 bit)
Best wishes,
Dan
July 1, 2008 — 4:51 pm
Thanks!!! Things are working!!!
But, I forget my sandbox’s password. Actually, I think I typed in correctly but got rejected, I tried to switch user to sandbox in my host, the password is really wrong. Please, how to reset it?
July 4, 2008 — 6:58 pm
Russ, Thanks a million for posting this step by step guide for novices like me. I had installed VMWare Workstation and simply could not get their VMWare Tools to install to allow me to transfer files back&forth between Windows Vista Host and Ubuntu Linux running as a virtual machine.
I followed your instructions to the T and I now have a shared (mapped) drive on Windows where I can easily deposti files that Linux can see and vice-versa. Simply amazing..
Thanks again. -Ashok
July 8, 2008 — 10:41 am
great work, thanks a lot!
Like most of people here, struggling with this for already a long time and now found an easy solution.
thanx mate!
July 11, 2008 — 9:24 pm
Excellent guide… got me up and running very quickly. Glad to find the link to this page in the Ubuntu Forum.